

Data filtering techniques for threat hunting
Why is filtering data important? Well, Splunk allows you to store
gigabytes, terabytes, or even petabytes of full-fidelity security data —
yet the evidence you are seeking during a hunt or investigation is
often contained in just a few events.
You need to eliminate the noise and expose the signal.
To do this, we will focus on three specific techniques for filtering
data that you can start using right away. For all three tutorials,
below, we use data from our Boss of the SOC v1.0 data set.
Technique 1. It’s About Time: Specifying a time range
The most obvious (but often overlooked) technique for reducing the
number of events returned by your Splunk search — and getting you closer
to actionable results — is to specify an appropriate time range.
If you can put a left and right boundary on the timeline of your
hunt, you enable Splunk to ignore events from time periods that have
nothing to do with your hypothesis, potentially saving you valuable time
and system resources along the way.
For most Splunk users, the easiest way to specify the time range is
to use the time range picker as shown in Figure 1 (below). In this
example, I’m looking at some DNS events from our Boss of the SOC v1.0 data set. Specifically, I’ve asked Splunk to search all DNS activity on August 24, 2016:
- This search returned in about 6.6 seconds and returned about 55,000 results.
- The same search run over the entire month of August 2016 (not shown)
returned about 1.37 million events and took approximately 184 seconds
to complete.
In this case, selecting an appropriate time
range helped us realize a 96% reduction in both the number of events and
the time to run the search!
Your data and hunting hypotheses will vary, but remember — when hunting in Splunk, it pays to pay attention to time.
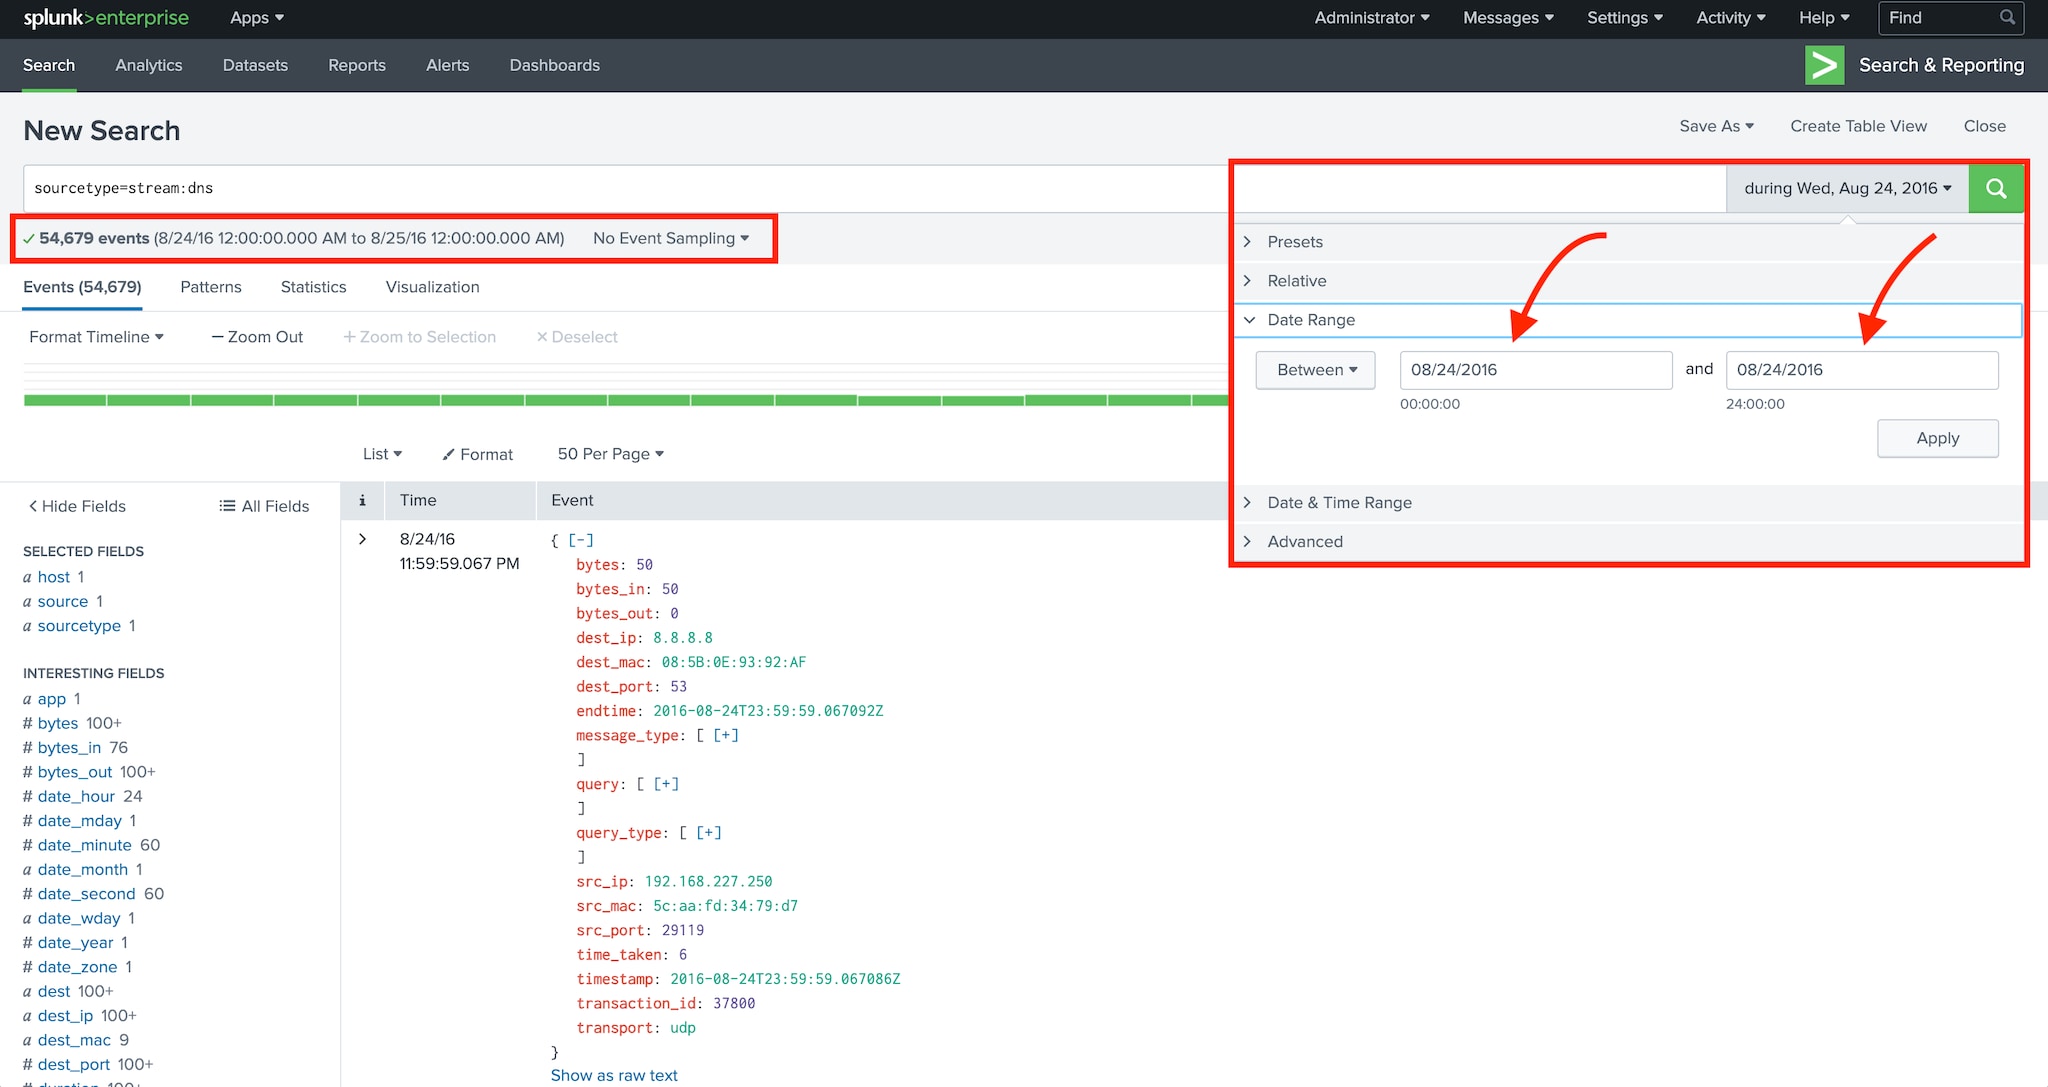
Figure 1: Filtering events based on timestamp
Technique 2. Fields of Dreams: Using field-value expressions
Splunk is often referred to as a search engine for your data, and
it’s easy to see why when you enter a simple phrase into the search app.
Events containing this phrase begin to appear, usually within just a
few seconds. We sometimes refer to searching in this way as
“super-grepping”, and — while it can be effective — Splunk has a lot
more power under the hood.
One excellent way to up-level your Splunk search skills (and to
become a more effective threat hunter in the process) is to begin
harnessing the power of field-value expressions to narrow your search.
As Splunk is returning results, it’s also extracting fields from each event. You can take advantage of these fields using the Splunk Search Processing Language
(SPL). Events generated by different systems in your environment will
have different fields; however, all events in Splunk have a few common
fields, including:
These fields are special! They are extracted and
stored immediately when the events are indexed which, in turn, makes
searches that use these fields very fast.
One of the best ways to begin filtering events in Splunk is to search
for a specific sourcetype by simply including a field-value pair like
the following in your Splunk search as early (meaning as far to the
left) as possible. This example shows a simple search that filters
results to include only Microsoft Sysmon events.
sourcetype="XmlWinEventLog:Microsoft-Windows-Sysmon/Operational"
Next, let’s look at how you can combine multiple fields to narrow
your search even further. Note that when you search multiple fields,
Splunk combines the search terms together using a logical “AND”
operator.
Figure 2 below includes an example of a multi-field search that
returns all the Microsoft Sysmon events that came from the system named
“we4781srv”.
sourcetype="XmlWinEventLog:Microsoft-Windows-Sysmon/Operational"
host="we4781srv"
Note that these sample searches are subject to the time window you
chose for the search (see technique 1 above), and they will only
retrieve results from the Splunk indexes to which you’ve been granted
access. In production environments, it’s a good practice — and sometimes
required — to add “index=<myindexname>” to the beginning of your
search.
Now, let’s have a look at the additional fields available in these Microsoft Sysmon events.

Figure 2: Examining fields in a Microsoft Sysmon event
A few helpful tips as you start to tailor your Splunk threat hunting searches using fields:
- Field names are case sensitive, e.g. “EventCode” and “eventcode” are entirely different fields and each could have a different value.
- Field values are case insensitive so “system” and “System”
are equivalent. If you need to match on case sensitive field values,
look into the Splunk where SPL command. - Wildcards in field-value pairs are often very useful, e.g.
sourcetype=”stream:*”, src_ip=”192.168.250.*”, or sourcetype=”*sysmon*”. - The Boolean operators “AND”, “OR”, and “NOT” and parentheses for
grouping are supported. Be sure to capitalize the Boolean operators, or
you might end up super-grepping for the word “and” which is almost
certainly not what you intended. - Other comparison operators such as “<“, “>”, “<=”, “<=”, and “!=” are also supported.
Get more details on the Splunk search command.
Technique 3. This is NOT the Data You Are Looking For: Using the NOT Operator
Finally, let’s look at a quick and effective filtering technique we
have available when threat hunting with Splunk — namely the “NOT”
Boolean operator.
As we’ve seen, the primary goal while hunting in Splunk is to remove
events from the result set that don’t help to prove or disprove our
hypotheses. The “NOT” operator is a great tool for this purpose.
Let’s start by examining some DNS queries captured by Splunk Stream
during the month of August 2016. In this case we might be investigating a
system that has been behaving suspiciously, or we may be looking for
“threads to pull” to help us formulate a hunting hypothesis. Here we
will use Splunk to first summarize the requests, then we’ll eliminate
data that we can explain — and dig deeper on data that we can’t.
The search in Figure 3 (below) yields 234 unique DNS queries, with nothing obviously suspicious or malicious.

Figure 3: A simple search to review DNS activity
sourcetype=stream:dns src=192.168.250.100 query_type{}=A
| stats count by query
| sort -count
Now let’s start filtering using “NOT.” First up is to get rid of some
DNS lookups that are used for browser configuration and IPv6 tunneling.
To accomplish this, we add a couple of “NOT” field-value pairs. Note
the use of wildcards to catch instances from different domains.
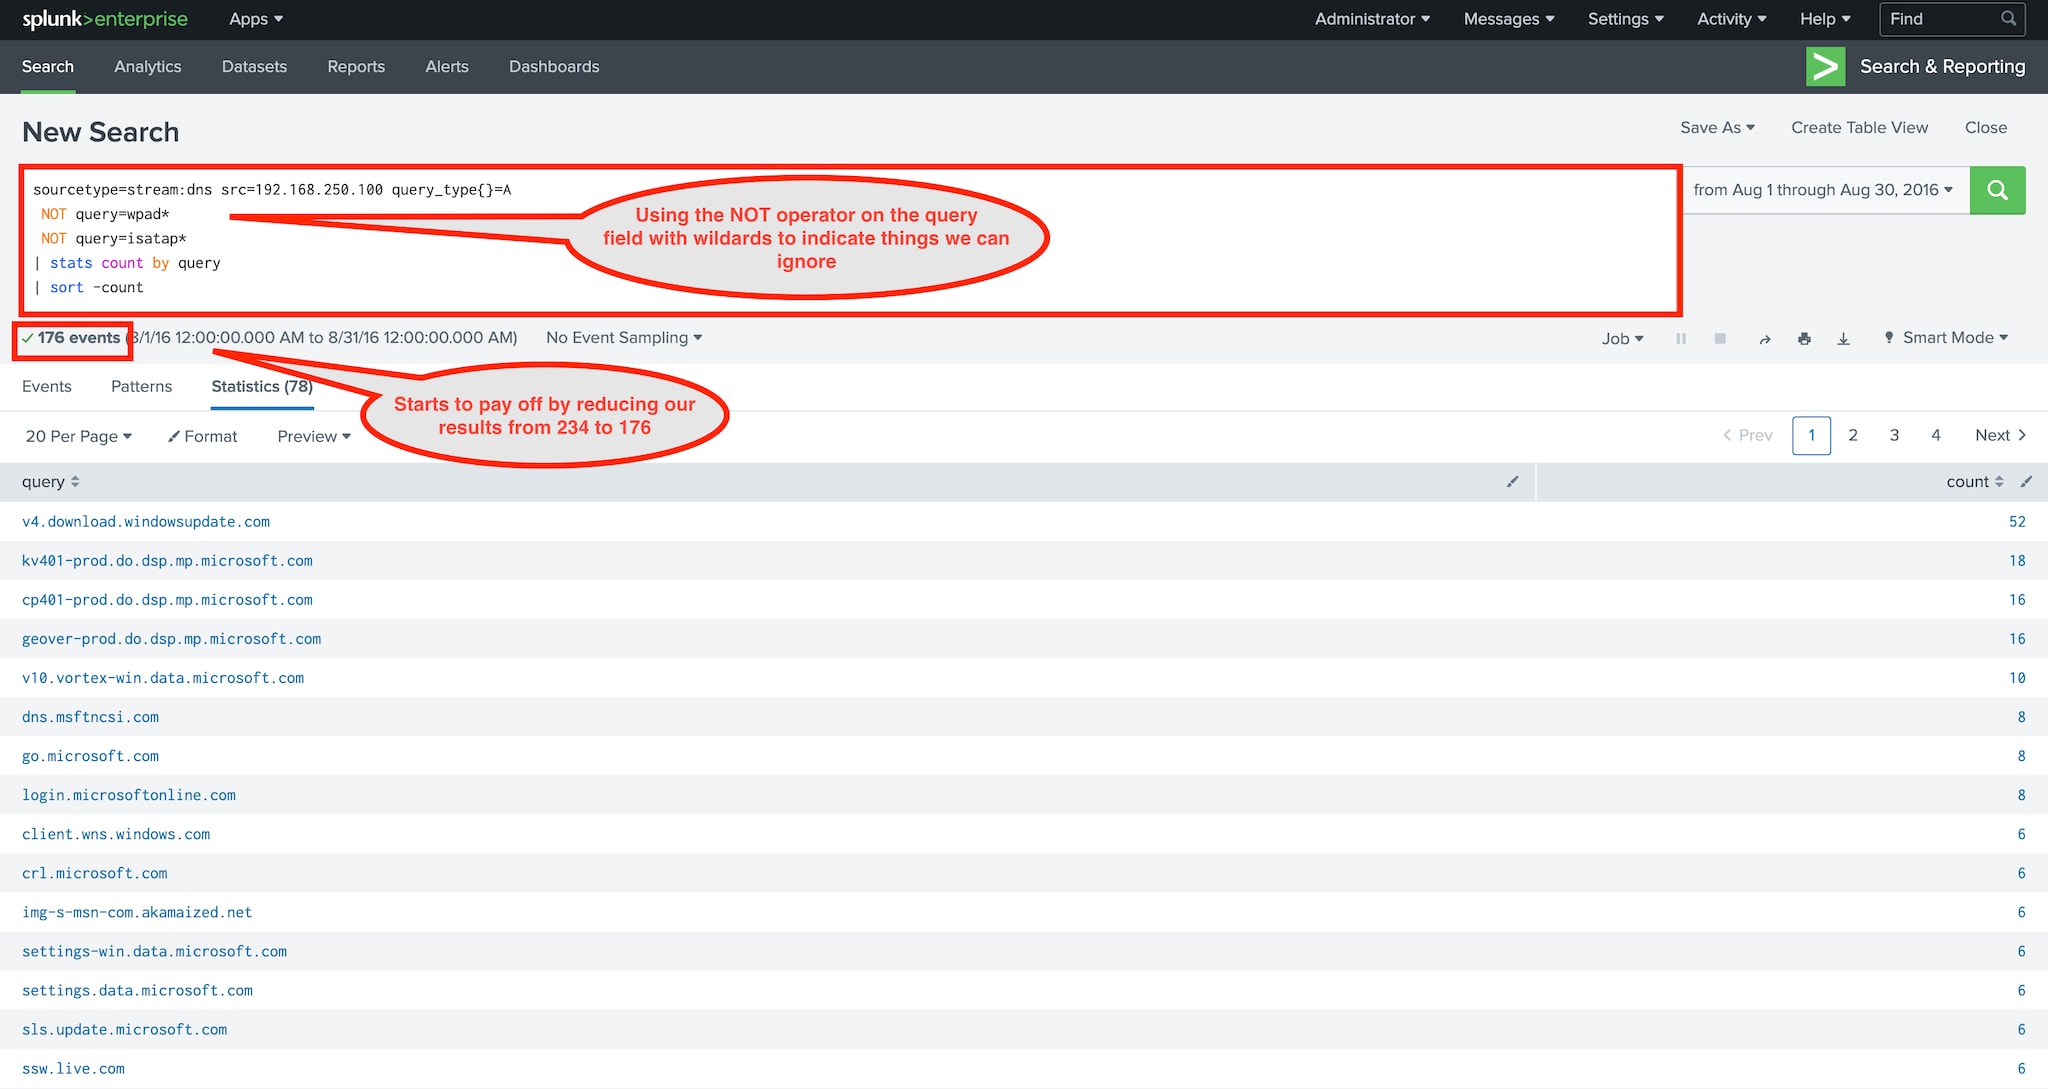
Figure 4: Starting to filter with NOT
sourcetype=stream:dns src=192.168.250.100 query_type{}=A
 NOT query=wpad*
 NOT query=isatap*
| stats count by query
| sort -count
Here the benefits of our filtering begin to emerge. In this case, we
reduced our result set size from 234 to 176. Now let’s continue by
filtering results from:
- Authorized vendors/products (this varies in every environment)
- Local domains
- Content delivery networks (CDNs)
- Etc.
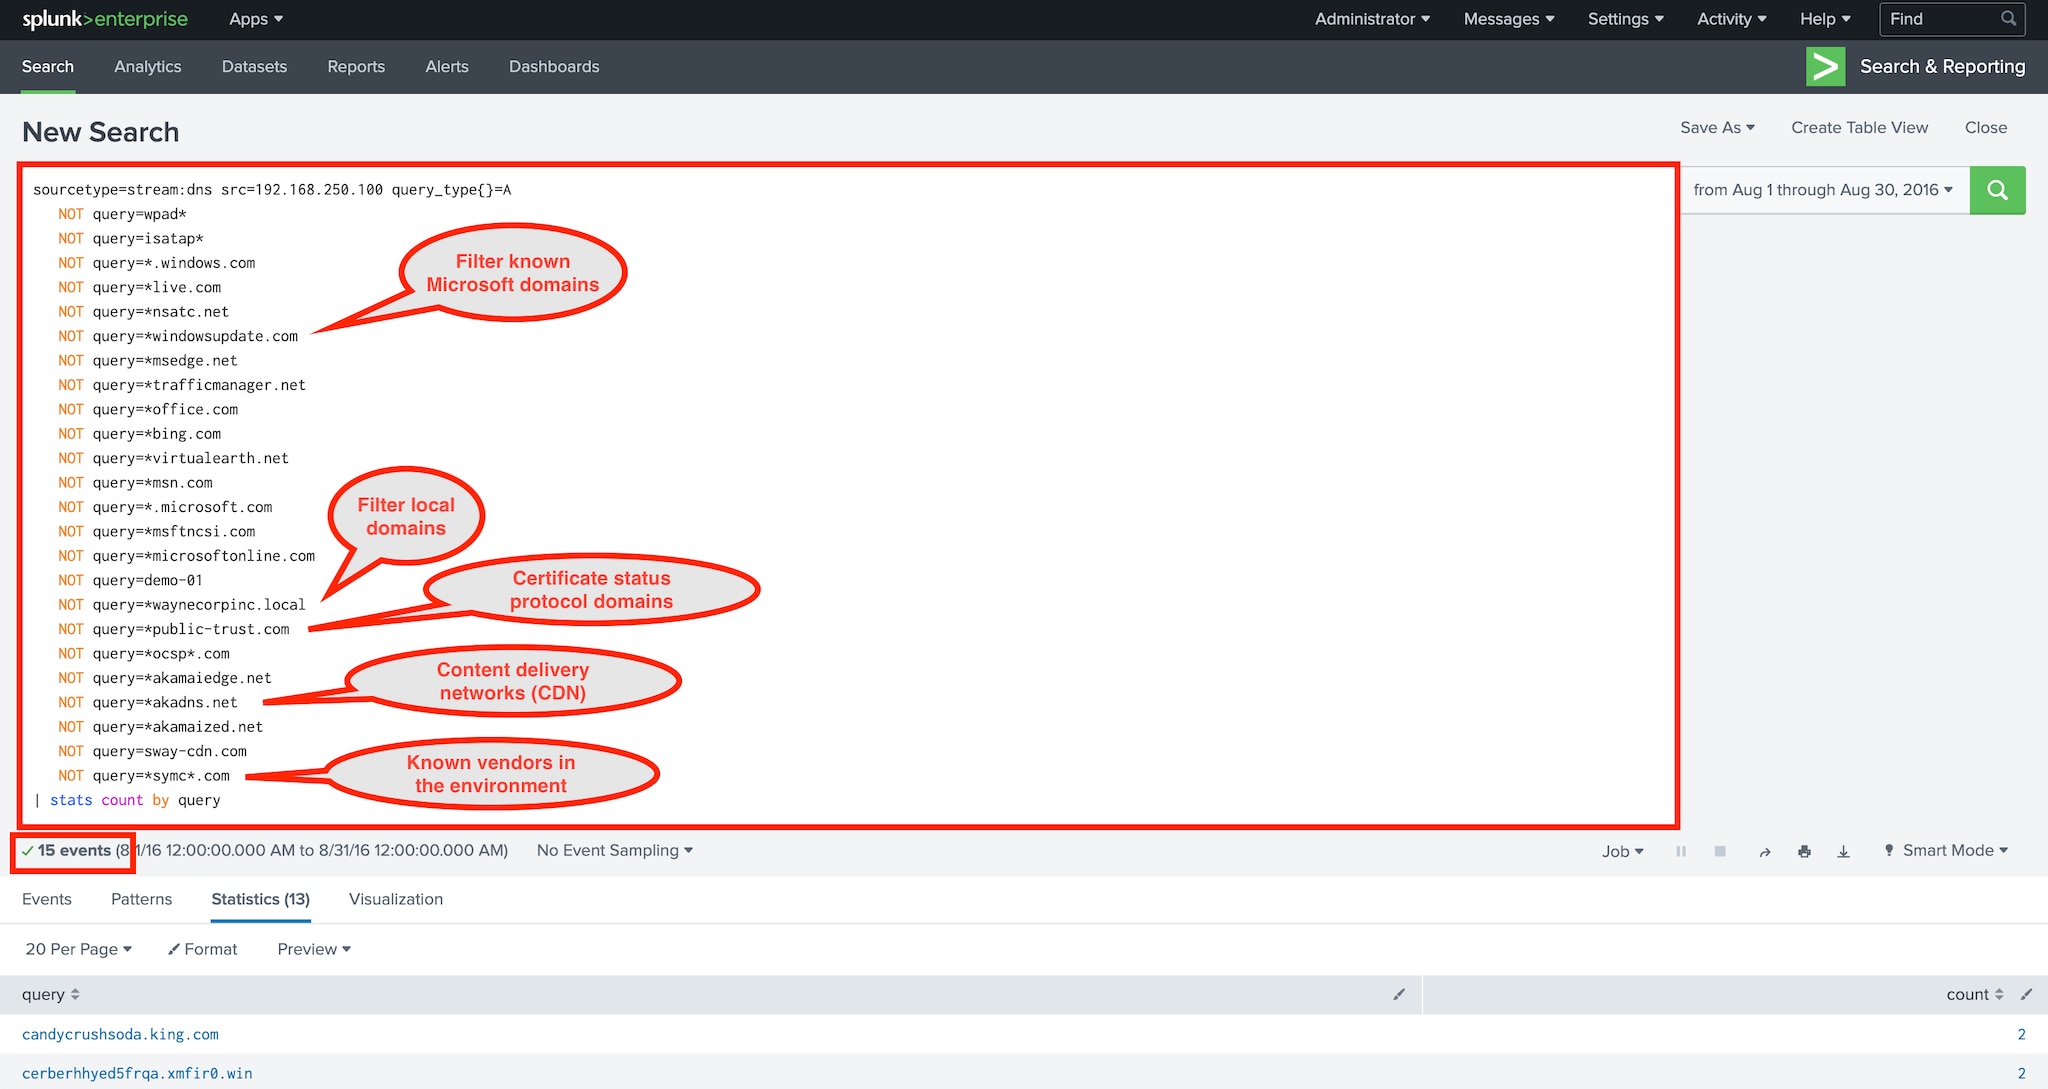
Figure 5: More filtering
sourcetype=stream:dns src=192.168.250.100 query_type{}=A
   NOT query=wpad*
   NOT query=isatap*
   NOT query=*.windows.com
   NOT query=*live.com
   NOT query=*nsatc.net
   NOT query=*windowsupdate.com
   NOT query=*msedge.net
   NOT query=*trafficmanager.net
   NOT query=*office.com
   NOT query=*bing.com
   NOT query=*virtualearth.net
   NOT query=*msn.com
   NOT query=*.microsoft.com
   NOT query=*msftncsi.com
   NOT query=*microsoftonline.com
   NOT query=demo-01
   NOT query=*waynecorpinc.local
   NOT query=*public-trust.com
   NOT query=*ocsp*.com
   NOT query=*akamaiedge.net
   NOT query=*akadns.net
   NOT query=*akamaized.net
   NOT query=sway-cdn.com
   NOT query=*symc*.com
| stats count by query
We’ve now significantly reduced the result set size all the way down
to 15! At this point, it becomes much easier to identify things like:
- Unauthorized software (Acronis in this case)
- Social media usage (X/Twitter)
- A couple domains that are just downright suspicious looking
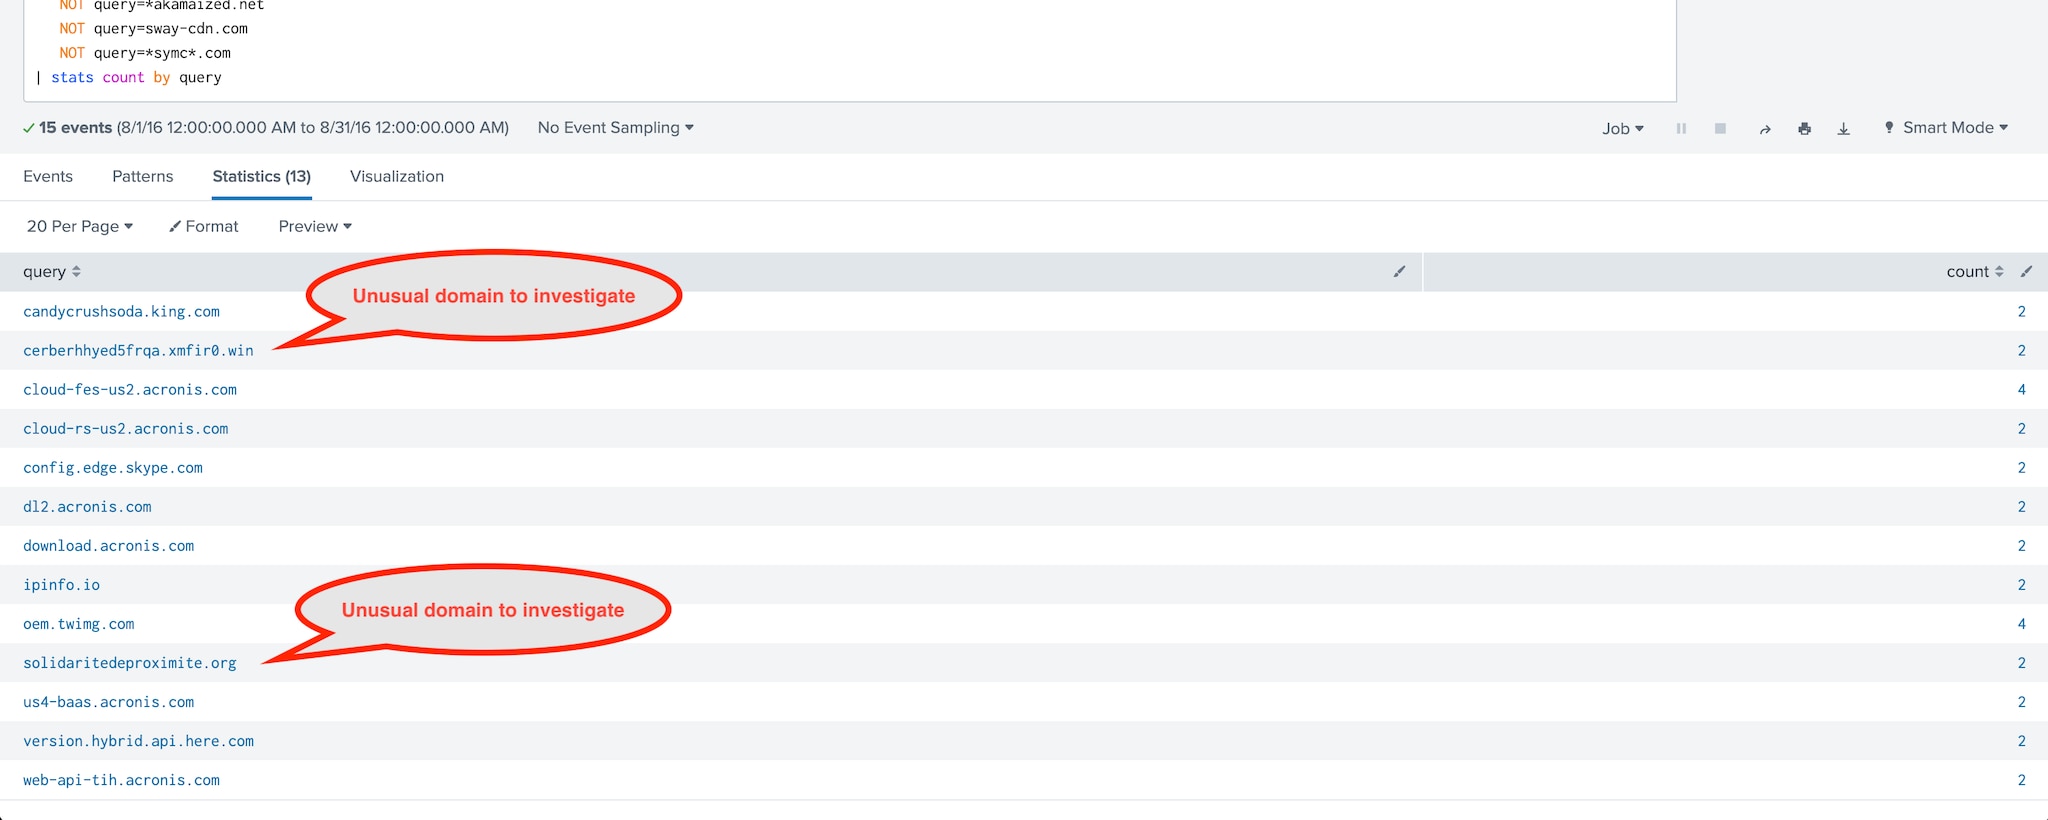
Figure 6: Visually inspecting the filtered data set
As searches like this grow in size, it often makes sense to consolidate them into a Splunk lookup table. Check out Using the Lookup Command for Threat Hunting (Lookup Before You Go-Go).
Reference link here
A.K